True vintage ’70s style isn’t about expensive brand names; it’s about knowing the hidden markers of quality and history that fast fashion can’t replicate.
- Authenticity is found in forensic details like stitching, tag placement, and fabric wear—not just logos.
- Understanding historical sizing anomalies and reversible tailoring unlocks a wider, more affordable range of garments.
Recommendation: Stop shopping for labels and start hunting for details. Your wallet and your wardrobe will thank you.
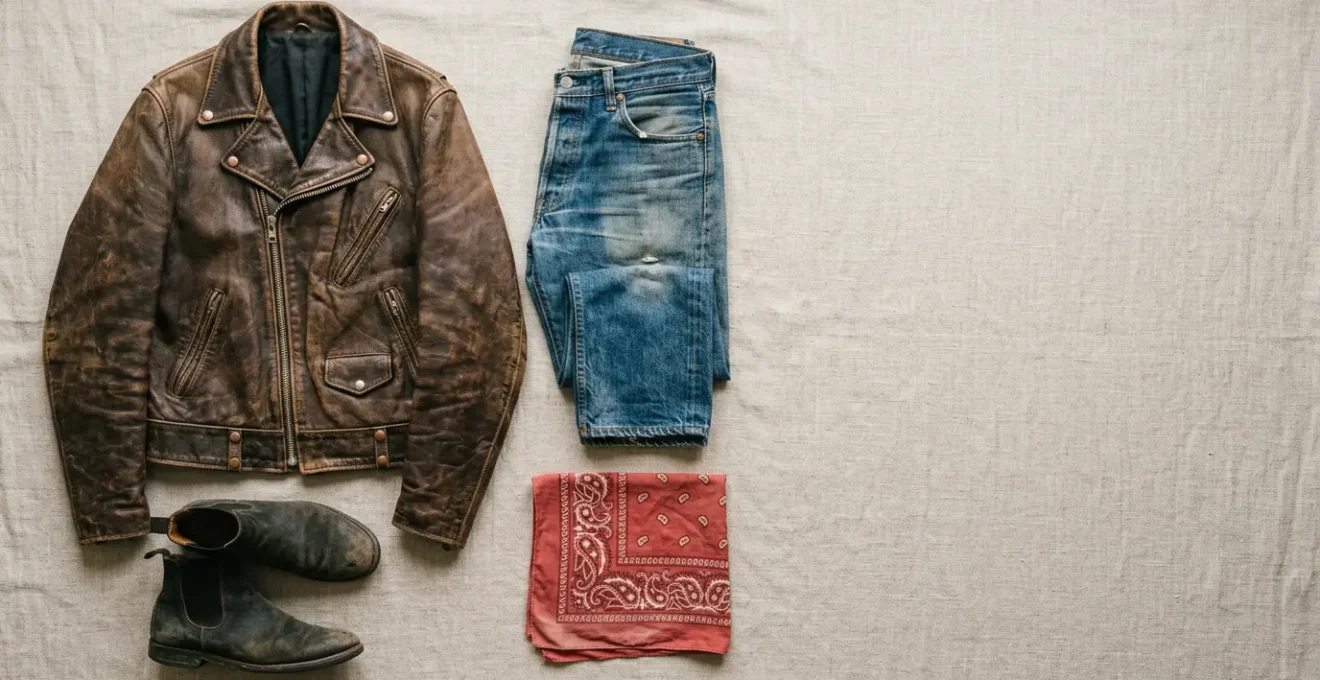
Trying to capture the raw, effortless cool of ’70s rock and roll fashion can feel like a fool’s errand. You see a picture of Jimmy Page in a silk shirt or Debbie Harry in a perfect leather jacket, and the hunt begins. Most advice points you toward crowded thrift stores or generic online searches for « bell bottoms » and « band tees. » The result? Either you find nothing, or you end up with a cheap, modern knockoff that feels more like a Halloween costume than an authentic statement. The alternative seems to be paying exorbitant designer prices for « vintage-inspired » pieces that miss the point entirely.
The frustration is real. You want the genuine article—the fabric that has lived a life, the fit that was tailored for a different era, the patina that can’t be faked. Many believe the key is to hunt for iconic brand names, but this often leads to a dead end of high costs and clever counterfeits. The common wisdom tells you to look for the *what*—a leather jacket, a pair of faded jeans—but rarely teaches you the *how*. How do you spot the real deal? How do you care for a garment that’s half a century old? How do you make it work for you today?
But what if the secret wasn’t in finding the right *items*, but in mastering the forensic *details*? The real value, and the real savings, come from understanding fabric, stitching, and decay. This is about shifting your mindset from a simple shopper to a vintage archaeologist. It’s about learning the language of old clothes—the story told by a single stitch, a faded tag, or the weight of a zipper. This knowledge empowers you to unearth incredible, high-quality pieces for a fraction of the cost of their modern-day equivalents.
This guide will equip you with that knowledge. We will dissect the key elements of authentic vintage, from identifying real Levi’s to understanding the anatomy of a leather jacket that will outlast you. Forget the brand hype; we’re going deep into the textile forensics that separate the treasures from the trash.
Summary: Your Guide to Nailing Authentic 70s Rock Style
- How to Identify Real Vintage Levis by Checking the Tab and Stitching
- Dry Clean or Hand Wash: How to Clean a 50-Year-Old Silk Shirt Without Ruining It
- Why a ‘Medium’ from 1975 Fits Like an ‘Extra Small’ Today
- The Storage Mistake That Lets Moths Destroy Your Vintage Wool Collection
- How to Tailor Vintage Pieces to Fit Modern Bodies While Keeping the Period Look
- Why a ‘Very Good Plus’ Rating Can Vary Wildly Between Sellers on Discogs
- Perfecto or Knockoff: Is the Original Brand Worth the $1000 Price Tag?
- How to Choose a Leather Biker Jacket That Will Last a Lifetime
How to Identify Real Vintage Levis by Checking the Tab and Stitching
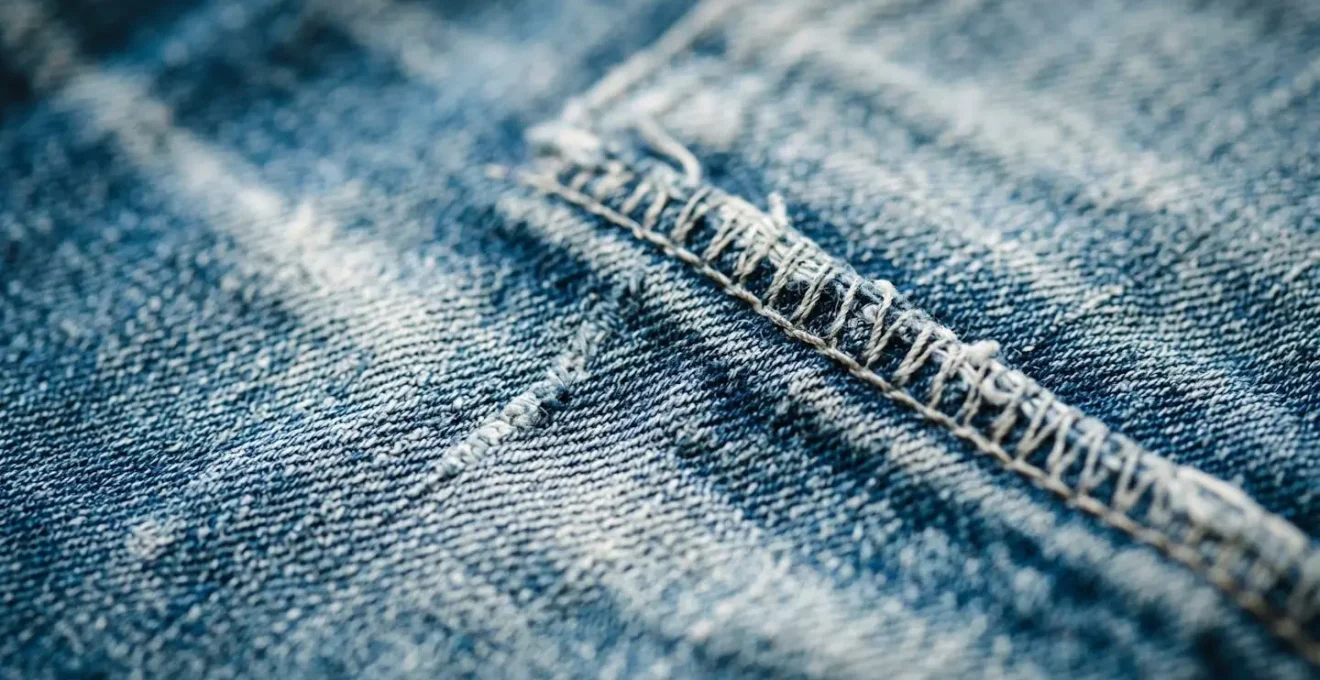
The foundation of any ’70s rock look is a great pair of jeans, and nothing says classic like Levi’s. But the market is flooded with reproductions and newer models masquerading as vintage. As a buyer, your eyes need to become tools of forensic examination. The difference between a $20 pair of modern jeans and a $500 collector’s item is written in the tiny details that most people overlook. It starts with the most famous detail of all: the Red Tab.
Before 1971, the name on the tab was spelled « LEVI’S » in all capital letters, a detail now known as the « Big E. » Finding a Big E tab is the first major clue that you’re holding a piece of history. Post-1971, the tab switched to the lowercase « LeVI’S. » Another critical marker is the selvedge line. Flip the cuff of the jeans; if you see a clean, finished edge with a colored (often red) line of stitching, you’ve found selvedge denim. This means the jeans were made on an old-school shuttle loom, a practice largely phased out by the late 1970s in favor of cheaper, mass-production methods.
Don’t stop there. The care tag (or lack thereof) is another giveaway. True pre-1971 jeans have no care tag at all. Later ’70s and ’80s pairs will have them, but details like a single-stitch inseam (a single line of thread running down the inner thigh) can help you date a pair to before the mid-1980s. This knowledge turns a thrift store hunt into a treasure hunt, as demonstrated by savvy collectors.
The $10 to $500 Vintage Levi’s Authentication
A prime example of this forensic approach comes from a denim enthusiast who found a pair of Levi’s 501s for just $10 at a garage sale. By applying these exact principles—identifying the « Big E » red tab, confirming the presence of selvedge denim, and noting the complete absence of a care tag—they authenticated the jeans as genuine pre-1971 vintage. As further detailed in a breakdown of vintage Levi’s authentication, after documenting these markers, the jeans were sold to a collector for $500. It’s a testament to how knowing the story told by stitching and tags transforms a cheap find into a valuable asset.
Dry Clean or Hand Wash: How to Clean a 50-Year-Old Silk Shirt Without Ruining It
Finding a gossamer-thin, ’70s-era silk shirt is a moment of pure vintage bliss. It drapes unlike anything modern, with a story woven into its very fibers. But that bliss can quickly turn to terror when you realize it needs cleaning. A 50-year-old silk garment is not just a piece of clothing; it’s a delicate artifact. The dyes are unstable, the fibers may be weakened by age and sunlight, and a single wrong move can cause irreversible damage like color bleeding, shrinkage, or even shredding.
Before you even think about water, you must act like a textile conservator and perform a stress test. Your first allegiance is to the preservation of the garment. Start with a colorfastness test. Find a hidden area, like an inner seam or the tail of the shirt, and dampen a small spot with a drop of cool water. Blot it with a clean white cloth. If any dye transfers to the cloth, stop immediately. Your only safe option is a professional dry cleaner who specializes in vintage or delicate textiles.
If it passes the color test, assess the fabric’s integrity. Gently tug on a seam. Does it feel strong, or does it feel fragile and brittle, like it might pull apart? If there’s any sign of weakness, it’s another red flag for water-based cleaning. If the fabric feels sound, you can proceed with a gentle hand wash in cool water with a tiny amount of a pH-neutral, silk-specific detergent. Never wring or twist the fabric; gently press the water out between two clean towels and lay it flat to dry away from direct sunlight.
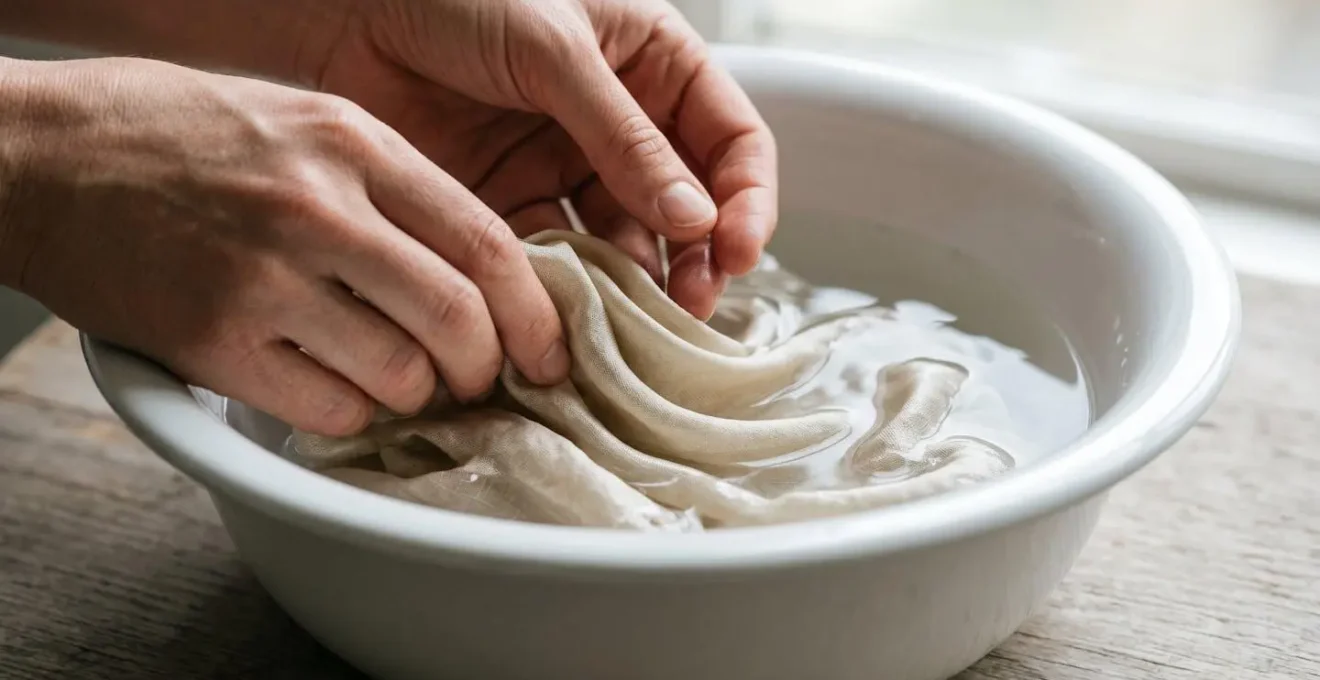
As the image above illustrates, the process is one of extreme care. This isn’t about scrubbing out a stain; it’s about gently refreshing a piece of history. Remember, some issues like set-in stains or severe fading are beyond home care. As experts in silk care often note, « Vintage silk garments and accessories typically take specific attention… Specialized silk restoration services can resolve many problems » that you cannot. When in doubt, always default to professional help. Ruining a one-of-a-kind piece is a mistake you only make once.
Why a ‘Medium’ from 1975 Fits Like an ‘Extra Small’ Today
You’ve found the perfect vintage shirt online. The seller lists it as a « Medium, » your size. It arrives, and you can barely get it over your shoulders. This isn’t a mistake; it’s an encounter with one of the biggest hurdles in vintage shopping: vanity sizing. The concept of clothing sizes has drastically shifted over the decades. What was considered a Medium or even a Large in the 1970s is often an Extra Small or Small by today’s standards. Brands have progressively re-labeled smaller sizes with larger numbers to make consumers feel better, rendering vintage size tags almost meaningless.
The historical data is staggering. For example, a look back at clothing catalogs reveals a dramatic change in what sizes represent. A piece of archival data from Sears catalogs shows that in 1937, a dress with a 32-inch bust was labeled a size 14. By 1967, that same 32-inch bust was a size 8, and by 2011, it had become a size 0. This « sizing anachronism » means you must completely ignore the tag and rely on one thing only: precise measurements.
Never buy a vintage piece online without comparing its measurements to your own. A reputable seller will provide them, but you need to know what to ask for and how to measure yourself. Forget your « usual size » and create a personal measurement chart. The five essential measurements you need are:
- Bust: Measure around the fullest part of your chest.
- Waist: Measure your natural waist, typically the narrowest point just above your belly button. This is critical for high-waisted ’70s pants.
- Hips: Measure the fullest part of your hips and rear.
- Shoulder Width: Measure from the point of one shoulder across your back to the other. Inflexible vintage jackets make this non-negotiable.
- Inseam: For pants, measure from the crotch seam down to your desired hem length.
This is the only language that matters in the world of vintage. It bridges the 50-year gap between their « Medium » and your body. Mastering your measurements is the single most important skill for unlocking the vast world of online vintage and ensuring that what you buy will actually fit.
The Storage Mistake That Lets Moths Destroy Your Vintage Wool Collection
You’ve scored a beautiful vintage wool peacoat or a classic ’70s band tour jacket. You wear it all winter, and as spring arrives, you hang it in the back of the closet, waiting for the cold to return. This is the single most common—and costly—storage mistake a vintage owner can make. Come autumn, you might pull it out to find a constellation of tiny, heartbreaking holes. The culprit: clothes moths.
The common misconception is that moths are simply attracted to wool, cashmere, or other natural fibers. While they do consume these protein-rich materials, that’s not what initially draws them in. As pest control experts point out, « Moths and other pests are attracted to food or perspiration stains more than they’re attracted to fabric. » That invisible sweat, skin cells, or tiny food spill from months ago is a blaring dinner bell for moths. The first and most crucial rule of storing vintage wool is to clean it thoroughly before putting it away for the season. A professional dry cleaning is your best bet to remove any and all organic residues.
Once clean, storage becomes about creating an impenetrable fortress. Forget old-fashioned mothballs, which are toxic and leave a stench that’s nearly impossible to remove. Natural repellents like cedar and lavender are pleasant, but they only deter moths; they don’t kill larvae and their effectiveness fades over time. The only foolproof method is creating a physical barrier. Airtight plastic containers or vacuum-sealed storage bags are your best friends. They create a sterile environment where moths simply cannot enter.
Choosing the right method depends on your collection. This comparative table, based on professional pest management advice, breaks down the options:
| Repellent Type | Effectiveness Level | How to Use Properly | Longevity | Best For |
|---|---|---|---|---|
| Cedar Blocks/Planks | Moderate (repellent only, not killer) | Place inside storage bags or hang in closet; avoid direct fabric contact | Refresh every 2-3 years by light sanding | Wool coats, cashmere sweaters, vintage jackets |
| Lavender Sachets | Low to Moderate | Hang in closet or place in drawers; replace when scent fades | Replace every 3-6 months | Delicate silk items, linen, light cotton |
| Cloves (whole) | Moderate | Place in breathable pouches; distribute throughout storage area | Replace annually | Wool blankets, vintage textiles in long-term storage |
| Airtight Plastic Containers | Very High (prevention) | Clean items thoroughly first, seal completely with tight-fitting lids | Permanent solution when properly sealed | All vintage garments, especially high-value pieces |
Protecting your investment is as important as finding it. Proper cleaning and airtight storage are non-negotiable for ensuring your vintage wool treasures survive to be worn for many more years.
How to Tailor Vintage Pieces to Fit Modern Bodies While Keeping the Period Look
One of the great joys of vintage is finding a piece with incredible fabric and detail that doesn’t quite fit. Due to the « sizing anachronism, » you might find amazing ’70s trousers that are too long or a jacket that’s too boxy in the shoulders. Your first instinct might be to take it to a tailor and have them cut and sew it to fit perfectly. However, with true vintage, especially collectible pieces, a standard alteration can destroy its historical integrity and resale value. The expert approach is to insist on reversible alterations.
This means instructing your tailor to make changes that can be undone later without leaving a trace. The goal is to preserve the original garment in its entirety while temporarily adjusting it for your body. A skilled tailor who understands vintage will know these techniques, but you should go in prepared to advocate for your garment. For example, instead of cutting fabric from a hem, they can use a catch-stitch to fold up the excess length. This stitch is nearly invisible from the outside and can be easily released later.
Similarly, if a waistband needs to be taken in, the tailor should work within the existing seam allowance—the extra fabric inside the seams. As long as they don’t cut this excess fabric, the seam can be let out again to its original size. According to vintage tailoring experts, it’s often possible to let out waists by 1-2 inches if there’s enough allowance. This small adjustment can make a huge difference in fit and comfort, all while being completely reversible. Thinking this way protects your investment and respects the history of the piece.
Action Plan: Reversible Alteration Techniques to Preserve Value
- Work Within Seam Allowances: Instruct your tailor to take in seams without cutting the excess internal fabric, making any change fully reversible.
- Use Catch-Stitching for Hems: For shortening pants or sleeves, request a blind catch-stitch to fold up the material instead of cutting and re-hemming.
- Add Hidden Fastenings: For loose waistbands or cuffs, a tailor can add internal elastic or hidden drawstrings that can be removed without a trace.
- Preserve Original Hardware: If buttons need to be moved for a better fit, keep the original buttonholes intact and use careful hand-stitching for the new placement.
- Document Everything Beforehand: Take detailed photos and write down the original measurements of the garment before any work begins, creating a record for future restoration.
By adopting this preservationist mindset, you can wear and enjoy historical pieces without sacrificing their long-term value. It’s the ultimate way to make vintage work for a modern body.
Why a ‘Very Good Plus’ Rating Can Vary Wildly Between Sellers on Discogs
When you’re hunting for vintage online on platforms like Etsy, eBay, or Grailed, the condition rating is your primary guide. Terms like « Mint, » « Excellent, » or « Very Good Plus » (a term borrowed from vinyl record collecting) are meant to give you confidence in your purchase. The problem? There is no universally enforced standard. One seller’s « Excellent » is another’s « Good, » and what one person considers charming « authentic patina, » another sees as straight-up damage. This subjectivity is a minefield for buyers.
To navigate it, you must become a skeptic and a detective. Treat seller descriptions as a starting point, not the final word. You need to learn to decode the vague language they often use and know what red flags to look for. A « Mint » rating on a 50-year-old leather jacket should be treated with extreme suspicion. True unworn, deadstock vintage is incredibly rare. More often, « Excellent » means « I couldn’t find any major flaws in a quick look. » It might hide subtle issues like minor pilling under the arms, slight fading on one shoulder, or a seam that’s beginning to weaken.
This is where visual forensics come into play. A detailed inspection of a garment’s texture, stitching, and wear patterns tells a more honest story than any written description.
The table below, based on common terms used across vintage marketplaces, helps translate the marketing-speak into reality.
| Seller Term | What It Usually Means | Red Flags to Watch For | Questions to Ask Seller |
|---|---|---|---|
| ‘Mint’ or ‘Like New’ | Unworn or worn once, no visible flaws | Overstated for items that are clearly decades old | ‘Can you confirm this has never been worn and has original tags?’ |
| ‘Excellent’ or ‘Very Good Plus’ | Minimal wear, minor signs of age, fully functional | Subjective assessment, may hide small issues | ‘Are there any areas of pilling, fading, or loose stitching?’ |
| ‘Good’ or ‘Gently Used’ | Visible wear, possible minor flaws, still wearable | Could include small holes or stains not mentioned | ‘Can you photograph the seams and underarms under bright light?’ |
| ‘Fair’ or ‘As-Is’ | Significant wear, may have damage or stains | Often non-returnable; major issues likely present | ‘What are the specific flaws? Are there any odors like mildew or smoke?’ |
| ‘Perfectly Distressed’ or ‘Authentic Patina’ | Marketing term for visible wear that adds character | Damage being reframed as desirable | ‘Is this distressing original to the garment or due to damage over time?’ |
The ultimate power move is to ask specific, targeted questions. Don’t ask, « Is it in good condition? » Ask questions that demand a detailed, honest answer. A good seller will appreciate your diligence; a shady one will be evasive. Your best defense is a proactive offense.
Key Takeaways
- True vintage value lies in forensic details like stitching, tags, and fabric type, not just brand names.
- Mastering your body measurements and understanding reversible tailoring techniques are essential for a perfect, value-preserving fit.
- Adopt a « cost-per-wear » mindset: a high-quality, durable vintage piece is often a better long-term investment than a cheap, disposable modern one.
Perfecto or Knockoff: Is the Original Brand Worth the $1000 Price Tag?
The Schott Perfecto leather jacket is an icon, worn by everyone from Marlon Brando to The Ramones. A new one can cost upwards of $1000, which begs the question: is it worth it, or can a cheaper alternative do the job? To answer this, you have to stop thinking about the upfront cost and start thinking about the cost-per-wear. This is the true measure of value for any quality garment, and it’s where investment pieces demolish their cheaper counterparts.
A $200 fast-fashion leather jacket might seem like a bargain. But it’s likely made from « genuine leather » (a low-grade, corrected-grain material), held together with cheap glue and weak stitching, and fitted with plastic zippers that will fail in a few years. If you have to replace it every 3-5 years, your long-term cost adds up quickly, and you never get to experience the beautiful patina that only develops on high-quality leather.
Now consider the $1000 investment jacket. It’s made from full-grain hide that gets better with age, stitched for durability, and uses heavy-duty metal hardware. It’s built to last a lifetime. A simple cost-per-wear calculation shows that a $1000 jacket worn for 20 years comes out to just $50 per year, or about $4.17 a month. The $200 jacket, replaced every four years, costs the exact same amount annually but delivers a vastly inferior experience and ends up in a landfill. The high-quality jacket becomes a part of your story and holds its resale value; the cheap one becomes disposable trash.
This logic doesn’t just apply to new jackets. It’s the core argument for buying high-quality vintage. You can often find a 30-year-old, American-made jacket from a great brand for $200-$400. It has already proven its durability, developed an incredible patina, and will likely outlive any new jacket you could buy for the same price. The initial price tag isn’t the story; the longevity is. When you buy quality, you only have to buy it once.
How to Choose a Leather Biker Jacket That Will Last a Lifetime
A leather biker jacket is the definitive piece of rock and roll armor. But not all jackets are created equal. Choosing one that will last a lifetime—and look better every year—requires you to look past the style and inspect its core anatomy. As a buyer, you need to know the four pillars of quality: the leather, the hardware, the lining, and the stitching.
First, the leather itself. Look for full-grain cowhide or horsehide. This is the top layer of the hide with its natural grain and imperfections intact. It’s thick, durable, and develops a beautiful, unique patina over time. Be wary of jackets labeled simply « genuine leather, » which is often a marketing term for a lower-quality, bonded material that will crack and peel. Second, the hardware. Zippers are a key failure point. Look for heavy-duty metal zippers from legacy brands like Talon (especially the iconic Talon 42), YKK, or Scovill. Check the back of the zipper pull for the brand stamp. Plastic zippers are a major red flag.
Third, inspect the lining. A quality jacket will have a quilted cotton or satin lining that is fully stitched into the garment, not glued. The lining protects the leather from your body’s oils and provides insulation. Check the seams inside the sleeves and pockets for any signs of tearing or deterioration. Finally, examine the stitching. A well-made jacket will have a high stitch density (around 8-10 stitches per inch) and will be double or even triple-stitched at stress points like the shoulders and armholes. This prevents seam failure and is a hallmark of quality construction.
This forensic guide to jacket anatomy can help you assess any piece, new or vintage:
| Quality Element | What to Look For | Why It Matters for Longevity | How to Test |
|---|---|---|---|
| Leather Type | Full-grain cowhide or horsehide (thickest, most durable); avoid ‘genuine leather’ labels | Develops rich patina over decades; withstands weather and abrasion | Check leather grain: Full-grain shows natural imperfections; corrected grain looks artificially uniform |
| Zipper Brand | Vintage Talon (especially Talon 42), YKK, or Scovill zippers | Heavy-duty metal zippers last for decades; plastic zippers fail within years | Check zipper pulls for brand stamping; ensure smooth operation without catching |
| Lining Quality | Quilted cotton or satin lining, fully stitched (not glued) | Protects leather from body oils; adds insulation; prevents internal wear | Inspect interior seams: should be stitched, not glued; check for rips or deterioration |
| Stitching Density | 8-10 stitches per inch; double or triple-stitched stress points | Prevents seam failure under stress; indicates hand-crafted quality | Examine shoulder seams and armholes: tight, even stitching with no gaps |
Armed with this knowledge, you can bypass the big-name designer hype and find incredible value. There are many lesser-known vintage brands like Brooks, Vanson, or even old Sears private labels that were built to these high standards. Learning to spot quality construction is the ultimate thrifty move, allowing you to acquire a lifetime piece for a fraction of the price of a modern luxury brand.
Now that you’re equipped with the forensic knowledge to identify, care for, and tailor authentic vintage, the real hunt can begin. Start applying these principles on your next trip to a flea market or your next scroll through an online marketplace.