In summary:
- Building a reliable rig is less about expensive gear and more about systematically eliminating every potential point of failure.
- Power is the most overlooked risk; the right protection for the venue type is non-negotiable.
- Preventive maintenance on high-stress components like cables and strings is more effective than reactive repairs.
- Ergonomic layout and smart routing are as crucial as signal quality to prevent human error during a performance.
- A professional mindset means preparing for the worst-case scenario, from international power grids to merch table visibility.
The worst sound at any gig is silence. That dead air when the solo should be screaming, the crackle and hum that signals a dying connection, or the awkward five minutes of fumbling with a broken string. For any gigging musician, these moments are more than just technical difficulties; they’re confidence-killers and show-stoppers. The common advice is always the same: « buy good cables » or « get a hard case. » While not wrong, this advice barely scratches the surface and completely misses the professional approach.
The difference between an amateur setup that « mostly works » and a professional, fail-safe touring rig isn’t about the price tag on your amplifier. It’s about adopting the mindset of a tour manager. This mindset is built on a simple but profound principle: proactively identify and systematically eliminate every potential point of failure. It’s a shift from hoping for the best to engineering for the worst. It means understanding that the power from a dive bar’s wall is an active threat, that loading the van is a game of high-impact Tetris, and that even your own pedalboard can be an ergonomic minefield.
This guide isn’t just about buying better gear. It’s a blueprint for building a robust system. We will deconstruct the common failure points—from the fragility of your signal chain and the unpredictability of power to the physical protection of your instruments and the very human errors that can derail a performance. By dissecting each risk, you can build a rig that doesn’t just survive the road, but thrives on it, night after night.
This article provides a comprehensive roadmap for building a truly road-worthy setup. Below, you’ll find a summary of the key areas we will cover, each designed to help you anticipate and neutralize problems before they happen.
Summary: Building a Road-Proof Touring Rig
- Why Bad Cables Are the #1 Cause of Signal Loss and Hum on Stage?
- Surge Protector or Voltage Regulator: Which One Protects Your Amp in Dive Bars?
- Hard Case or Gig Bag: Which Protection Level Do You Need for Van Tours?
- The « One String » Error That Stops the Show for 5 Awkward Minutes
- How to Order Your Pedals to Minimize Tap Dancing During Songs?
- How to Get a Crushing Punk Tone With Only One Amp and No Pedals?
- The Lighting Mistake That Makes Your Merch Invisible to Departing Fans
- Why Do International Headliners Demand Such Complex Riders and Fees?
Why Bad Cables Are the #1 Cause of Signal Loss and Hum on Stage?
Cables are the circulatory system of your sound, and just like in the human body, they are the most likely point of failure. A cheap or worn-out cable doesn’t just stop working; it degrades your tone slowly, introducing noise, killing high-end frequencies, and creating intermittent issues that are a nightmare to diagnose mid-show. The primary culprits are physical stress—constant coiling, uncoiling, being stepped on—and weak solder joints at the connectors. While a lab test showing that professional cabling testing can reveal significant signal loss over long distances is an extreme scenario for a stage, it proves a fundamental principle: cable integrity matters immensely. A poor connection acts as a resistor, while damaged shielding fails to block radio frequency interference (RFI) and electromagnetic interference (EMI), which is the source of that dreaded 60-cycle hum.
Adopting a professional approach means treating cables as a consumable item with a finite lifespan and implementing a rigorous maintenance process. This isn’t about simply buying the most expensive option; it’s about investing in cables with user-serviceable, high-quality connectors (like those from Neutrik) and learning basic soldering to perform your own repairs. It also means having a dedicated, tested backup for every critical cable in your rig. Before blaming your amp or pedals, always assume the cable is the problem. A systematic diagnostic approach can save you hours of frustration.
Action Plan: Cable Troubleshooting Protocol
- Visual Inspection: Before and after each gig, check cables and connectors for any visible physical damage, kinks, or loose connections. A quick visual scan can prevent a show-stopping failure.
- Signal Tracing: If you suspect a problem, use a signal tracer or simply swap cables one by one with a known-good cable to measure and isolate where the signal strength is dropping off.
- Wiggle Test: With the cable plugged in and the system live, gently wiggle the cable at the connector ends. Any crackling, popping, or signal cutting out indicates a faulty solder joint or internal break.
- Cable Testing: For a large setup, a dedicated cable tester is a worthy investment. It can quickly assess continuity, resistance, and shorts, instantly identifying a defective cable that might otherwise look fine.
Surge Protector or Voltage Regulator: Which One Protects Your Amp in Dive Bars?
The most dangerous variable at any gig is the one you plug into first: the wall socket. Power in older venues, dive bars, and festival stages can be wildly inconsistent, a condition professionals refer to as « dirty power. » This can manifest as noise, hum, and—most dangerously—voltage sags or spikes that can fry the sensitive electronics in your amps and pedals. As the experts at Sweetwater note, this is a pervasive issue in live environments.
Sudden spikes in voltage can be extremely dangerous to sensitive electronics. With power amps and racks of gear on individual switches, live sound settings are notoriously prone to voltage surges.
– Sweetwater Engineering Team, Power Management for Your Live Sound Rig
Simply using a cheap hardware store power strip is not a solution; it offers virtually no protection against the real threats. The choice between a surge protector, a power conditioner, and a voltage regulator depends entirely on the problem you’re trying to solve and the environment you’re playing in. A surge protector is the bare minimum, designed only to clamp down on sudden, brief voltage spikes. A power conditioner goes further, filtering out the RFI/EMI noise that causes hum. A voltage regulator, however, is the ultimate protection for touring, as it actively corrects for low voltage (brownouts) or high voltage, ensuring your gear receives a consistent, safe supply of power no matter how bad the source is.
The following table, based on a professional analysis of power management solutions, breaks down which tool is right for the job. For any musician touring regionally in vans and playing a variety of venues, a power conditioner is a wise investment. For international touring or relying on generators, a voltage regulator becomes essential.
| Protection Type | Problem Solved | Key Feature | Touring Level |
|---|---|---|---|
| Surge Protector | Voltage spikes from grid fluctuations | MOV protection against transient surges | Good: Local/regional gigs |
| Power Conditioner | Dirty power/noise from lights & dimmers | RFI/EMI filtering with transformer isolation | Better: Professional touring |
| Voltage Regulator | Voltage sag/brownouts from old wiring | Maintains steady output voltage regardless of input | Best: International venues with unpredictable power |
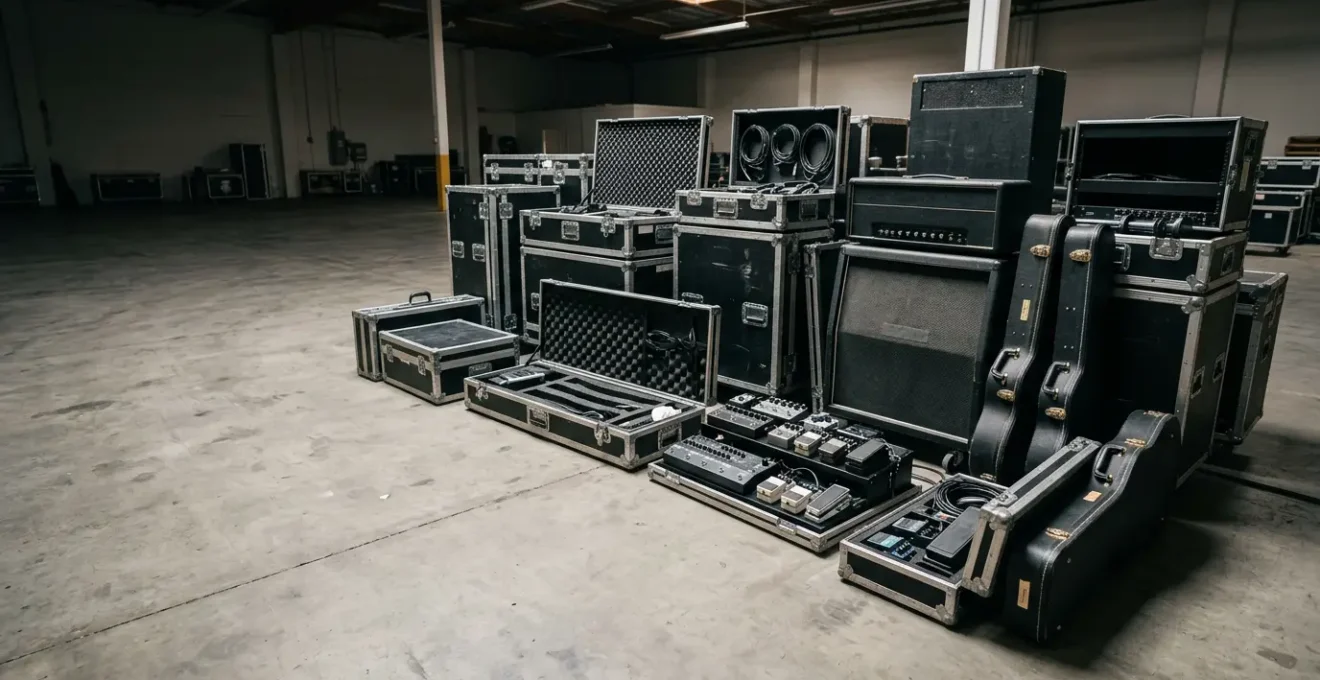
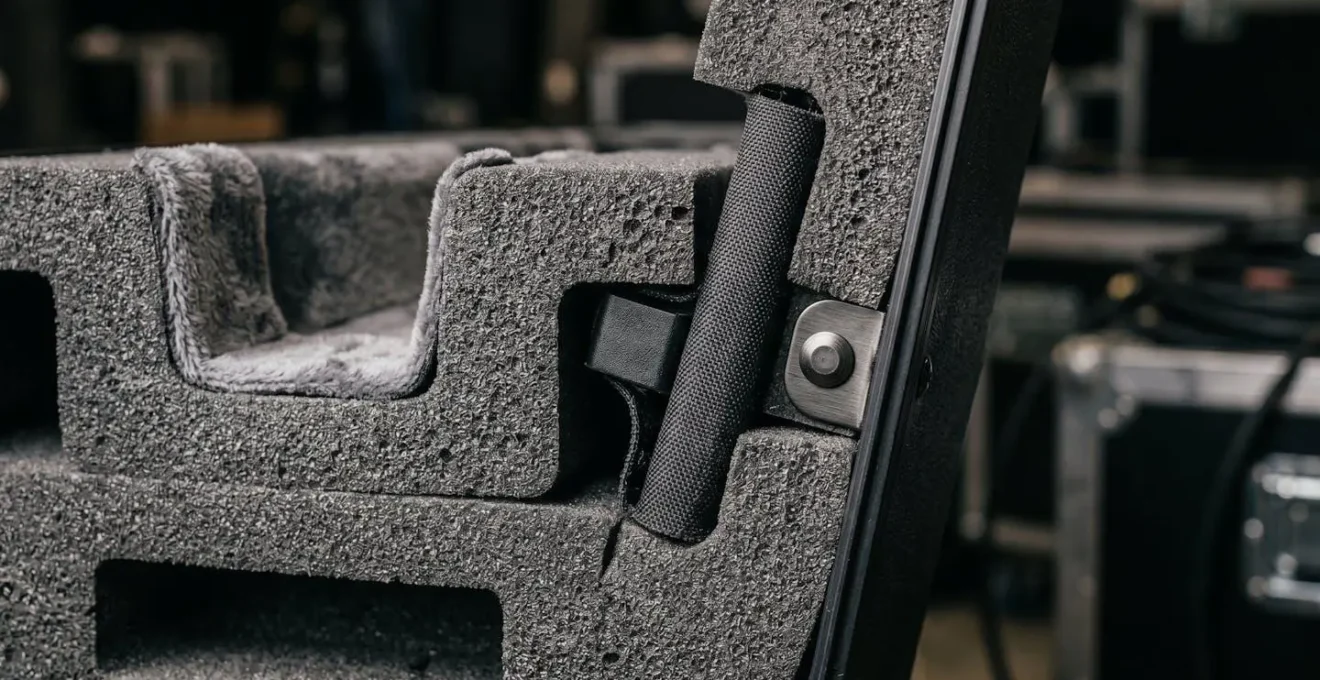
Hard Case or Gig Bag: Which Protection Level Do You Need for Van Tours?
The debate between hard cases and gig bags often misses the most important factor: context. The real question isn’t which is « better, » but which is appropriate for the specific risks of your travel. For a musician on a van tour, the primary risk isn’t a single catastrophic drop; it’s the cumulative damage from vibration and the high-impact game of « gear Tetris » during load-in and load-out. A soft gig bag, no matter how well-padded, offers zero protection against the crushing weight of a bass amp cabinet shifting on a tight turn.
The Professional Consensus on Instrument Protection
Professional touring musicians and instrument collectors consistently choose hard cases for peace of mind. A quality hard case can absorb serious impact, keep instruments dry in unexpected rain, and survive rough handling by airport baggage services. However, many professionals now rotate between options, using high-quality gig bags for light rehearsal days and deploying flight-rated hard cases when touring demands increase or when valuable and vintage equipment requires maximum, uncompromising protection.
This pragmatic approach has led to the rise of a third option: the hybrid case. These cases combine a lightweight design with a rigid foam structure, offering a significant upgrade in protection over a traditional gig bag without the bulk and weight of a hardshell case. They represent an ideal middle ground for van tours, providing crush resistance and superior shock absorption. Look for models with neck support cradles and robust, water-resistant exteriors. Ultimately, your choice should be a calculated risk assessment: if your instrument will be packed in a van with heavy amplifiers and drum hardware, a hard or hybrid case is not a luxury, it’s a necessity.
The « One String » Error That Stops the Show for 5 Awkward Minutes
There’s a palpable tension in the room when a string breaks mid-song. It’s an awkward, show-disrupting moment that can completely kill the energy of a performance. As the engineers at Graph Tech point out, it’s a significant mental hurdle for the performer.
There is never a good time to break a guitar string, especially when you’re in the middle of a gig. More than just a common annoyance, string breakage can be a confidence buster when you’re on stage.
– Graph Tech Engineering, Why Guitar Strings Break – Technical Analysis
The most common mistake musicians make is blaming the string itself. In reality, over 90% of string breaks occur not because the string is faulty, but because of a sharp edge or friction point on the guitar. The usual suspects are the bridge saddles and the nut. Over time, saddles can develop tiny, sharp burrs that act like razor blades against the string. Similarly, a poorly cut or binding nut slot can create a stress point that leads to premature failure. Aggressive playing styles only accelerate this process.
The professional solution is twofold: regular, preventive maintenance and a rapid-change system. First, make a habit of inspecting and maintaining these friction points. Second, have a backup guitar tuned and ready to go. Swapping guitars takes ten seconds; changing a string on stage can take five agonizing minutes. If a backup isn’t feasible, at least practice changing a string quickly under pressure. A « pre-flight » checklist for your instrument is a tour manager’s best friend against this common failure.
- Inspect bridge saddles for burrs: Use a piece of cotton or a Q-tip to gently rub across the saddles. If fibers catch, you’ve found a burr that needs to be polished with fine-grit sandpaper.
- Check nut slots for binding: Listen for a « ping » when tuning. This indicates the string is catching in the nut. A small amount of graphite (pencil lead) can provide lubrication.
- Pre-stretch new strings properly: After installing new strings, gently pull up on each one to stretch it out. This helps the string settle and ensures tuning stability, reducing friction at contact points.
- Clean strings after each use: Wipe down your strings with a clean cloth after playing. This prevents corrosive sweat and grime from building up and weakening the metal over time.
How to Order Your Pedals to Minimize Tap Dancing During Songs?
A pedalboard can quickly grow from a tool of creativity into an ergonomic nightmare. As you add more effects, you increase the likelihood of « tap dancing »—the frantic, multi-stomp shuffle required to switch sounds between song sections. This isn’t just awkward to watch; it’s a major source of performance errors. Hitting the wrong switch, missing a cue, or simply being distracted from your playing are all symptoms of a poorly designed workflow. The conventional wisdom about pedal order (e.g., dynamics -> gain -> modulation -> time) is important for signal quality, but it completely ignores the physical, human interface.
The professional solution to this problem is to separate the *signal path* from the *control surface*. This is achieved with a pedalboard loop switcher. A loop switcher is a central brain for your pedalboard. All your pedals are plugged into its dedicated loops, but your guitar signal only passes through the ones that are active. With a single stomp, you can activate a « preset » that engages any combination of pedals. For example, one button press can turn off your chorus and delay while simultaneously turning on your fuzz and phaser for a solo.
This approach has several critical advantages for a fail-safe rig. Firstly, it dramatically reduces human error. Instead of three stomps, you only need one. Secondly, it improves your tone by keeping your signal out of pedals you aren’t using, preventing the « tone suck » from multiple buffered or true-bypass pedals. Finally, it allows you to lay out your physical pedals for convenience (e.g., grouping all your delays together) rather than by signal chain order, as the switcher handles all the routing internally. Moving to a loop switcher is a significant step up from a simple daisy chain; it’s moving from a collection of pedals to an integrated effects system.
How to Get a Crushing Punk Tone With Only One Amp and No Pedals?
In the quest for tone, many guitarists fall into the trap of thinking more pedals equal more possibilities. But for raw, aggressive genres like punk, the opposite is often true. A truly crushing punk tone isn’t found in a pedal; it’s found in the direct, unadulterated relationship between your guitar, a cable, and an amplifier pushed to its breaking point. The secret lies in understanding how to manipulate the amp’s own gain structure and using your guitar’s controls as your primary tone-shaping tools.
The first step is to find the amp’s « sweet spot. » Turn off any master volume if you can and crank the preamp gain (or channel volume) until the sound begins to break up and compress. This is where the power tubes start to saturate, creating the natural, dynamic distortion that is the hallmark of classic rock and punk tones. The trick is to ride this edge. Set the amp to be slightly too distorted, then use your guitar’s volume knob to clean it up. Rolling the volume back to 7 or 8 can give you a crunchy rhythm tone, while pushing it to 10 sends the amp into full-on saturated lead territory. This technique gives you an incredible range of dynamics without ever touching a pedal.

Don’t neglect the amp’s EQ. A classic punk trick is to boost the midrange frequencies (around 800Hz to 1.5kHz). This helps the guitar cut through a dense mix with drums and bass, providing aggression and articulation without adding fizzy high-end or boomy low-end. Your picking hand becomes the final component. Attacking the strings harder will push the amp further into distortion, while a lighter touch will yield a cleaner sound. Mastering this amp-only approach not only simplifies your rig—making it inherently more reliable—but it also makes you a more expressive and dynamic player.
The Lighting Mistake That Makes Your Merch Invisible to Departing Fans
After you’ve played the last note of your encore, the most important part of your night from a business perspective is about to begin: merch sales. For many touring bands, merch revenue is the lifeblood that pays for gas and food. Yet, countless musicians make a critical, unforced error: they set up their merch table in near-total darkness. The house lights come up, but venues are designed to guide crowds towards the exits. The merch area is often relegated to a dark corner, making your t-shirts and records effectively invisible to departing fans.
Thinking like a tour manager means thinking about revenue streams. Your merch table should be a beacon, not a black hole. The solution is simple, cheap, and portable: strategic, battery-powered lighting. Don’t rely on the venue to provide adequate lighting, because they won’t. You must bring your own. A few clip-on, battery-powered LED lights can transform an invisible display into an inviting and professional-looking point of sale. Use warm-colored lights to create a welcoming atmosphere, and strategically aim them to highlight your best-selling items and your payment options (e.g., a sign with your Venmo QR code).
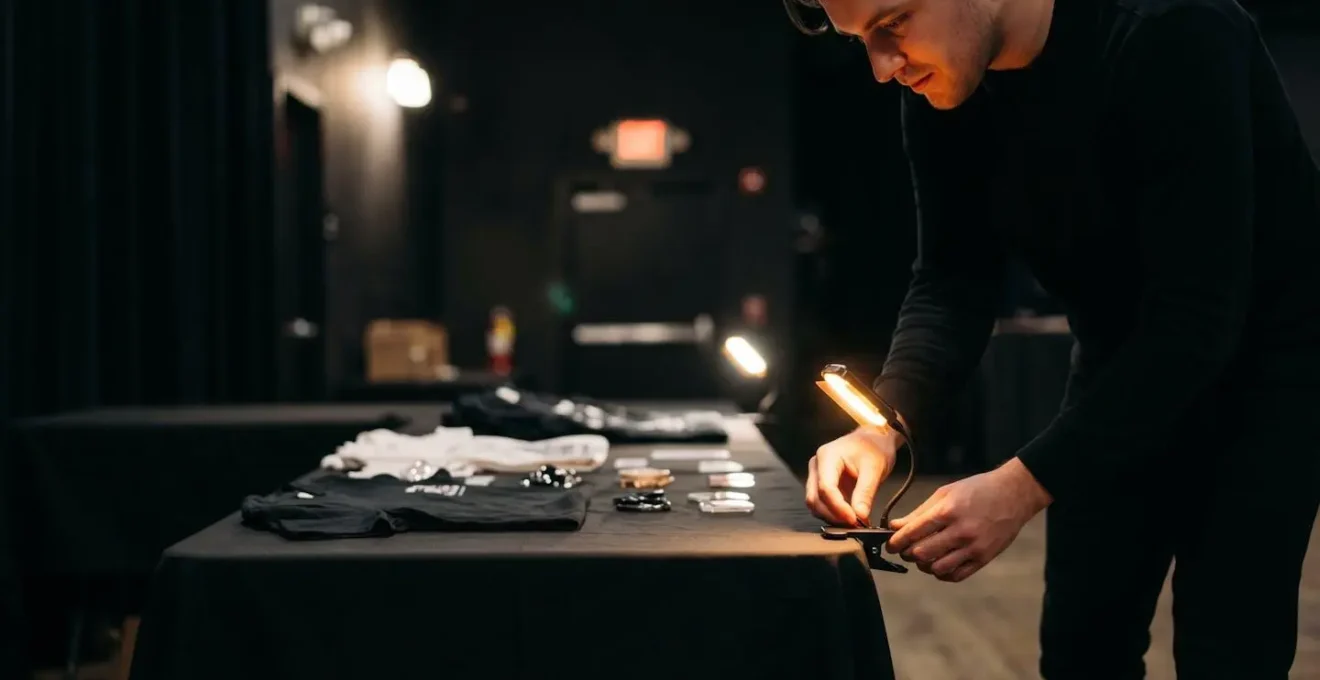
The goal is to interrupt the audience’s natural flow towards the exit. A well-lit, visually appealing merch table draws the eye and invites people to stop and browse. It signals that you are professional and open for business. A dark, disorganized table signals the opposite. This small investment in a few portable lights can have a direct and significant impact on your tour’s profitability. It’s one of the easiest and highest-return-on-investment upgrades you can make to your touring setup.
Key takeaways
- A road-worthy rig is a system designed to mitigate risk, not just a collection of expensive items.
- Every connection is a potential point of failure; proactive maintenance of cables, power, and hardware is paramount.
- Prepare for the worst environment, whether it’s unreliable power at a dive bar or the physical abuse of van transport.
Why Do International Headliners Demand Such Complex Riders and Fees?
To an outsider, a headliner’s tour rider can seem like a list of extravagant and entitled demands. The infamous stories—like Van Halen’s « no brown M&Ms » clause—paint a picture of rockstar divas. However, from a professional tour management perspective, a complex rider is one of the most critical tools for ensuring a consistent, safe, and successful show, especially on an international tour. It’s not about luxury; it’s about risk mitigation and standardization. The brown M&M clause was never about candy; it was a quick test to see if the local promoter had read the entire, highly technical contract. If the M&Ms were wrong, what else was wrong with the complex stage rigging?
A tour rider is a legal addendum to the performance contract, typically split into two parts. The Technical Rider is the most crucial. It specifies every technical requirement for the show: the exact dimensions of the stage, the number and type of power outlets required (and their voltage, which is critical internationally), the load-bearing capacity of the roof for lighting rigs, the number of local stagehands needed, and security requirements. For an international headliner with a massive production, these details are non-negotiable. Arriving in a new country to find the stage is too small or the power is incompatible would mean cancelling the show and losing hundreds of thousands of dollars.
The Hospitality Rider, while often the source of ridicule, serves a similar logistical purpose. It outlines everything from the number of dressing rooms and towels to the food and drinks required for the band and a crew that can number over 50 people. This isn’t just about comfort. It ensures the crew is fed and hydrated to perform their physically demanding jobs safely. It specifies security to protect the artists and their equipment. The fees associated with these riders cover the immense cost of transporting tons of equipment and dozens of personnel across borders, including work visas, carnets (customs documents), freight, and insurance. In essence, a complex rider is the blueprint for rebuilding a consistent, safe, and high-quality working environment in a different city every single night.
Now, take this professional mindset and apply it to your own rig. Start today by identifying your single biggest point of failure and creating a system to eliminate it. This is how you build a rig that doesn’t just survive, but lets you perform with total confidence, anywhere in the world.