The secret to a great 4-track demo isn’t better gear; it’s a mental shift: you must learn to perform the production itself.
- Commit to arrangements and EQ decisions destructively, shaping the sound on the way to tape.
- Use track bouncing not just to create space, but to add sonic « glue » and finalize mix elements early.
- Arrange instruments to occupy their own frequency space, preventing a muddy mix before it happens.
Recommendation: Embrace the 4-track’s limitations as creative tools that force decisive action and help you finish more music.
In a world of infinite digital audio workstation (DAW) tracks and endless plugins, the idea of recording with a four-track cassette machine feels almost defiant. Many songwriters and lo-fi enthusiasts, feeling the weight of « option paralysis, » are drawn to its simplicity. But the common advice— »just plug in and go »—ignores the real discipline required. The assumption is that the limitations are merely technical hurdles to overcome, when in fact, they are the very source of the machine’s creative power.
The true art of the 4-track isn’t about perfectly capturing sound; it’s about shifting your entire mindset. You are not just an engineer hitting ‘record’; you become a producer, an arranger, and a performer all at once. Every decision, from microphone placement to the act of bouncing tracks, is a permanent, destructive commitment. This isn’t a flaw; it’s a feature. It liberates you from the endless tweaking cycle of modern recording and forces you to make strong, immediate artistic choices.
This guide moves beyond the basics. It’s a framework for thinking like a 4-track master. We will explore how to perform the production, making every limitation a deliberate part of your sonic signature. We’ll deconstruct the techniques that transform constraints into character, turning what others see as obstacles into your most valuable creative assets.
This article provides a complete roadmap for mastering the 4-track production mindset. Below, you will find a detailed breakdown of the essential techniques and strategic decisions that will help you turn technical limits into creative triumphs.
Summary: A Guide to 4-Track Cassette Recording
- How to « Bounce » Tracks to Free Up Space Without Adding Too Much Noise?
- Mono Drums: Where to Place One Mic to Capture Kick and Snare Equally?
- Type I or Type II: Which Cassette Tape Formula Handles High Frequencies Best?
- The Over-Dubbing Mistake That Turns Your Mix into a Muddy Mess
- When to Commit to EQ Decisions During Recording Instead of Mixing Later?
- How to Get a Crushing Punk Tone With Only One Amp and No Pedals?
- How Does Limited Track Count Force More Creative Arrangement Decisions?
- How to Use Limitations to Fuel Creativity Like The Beatles Did at Abbey Road?
How to « Bounce » Tracks to Free Up Space Without Adding Too Much Noise?
Track bouncing, or « ping-ponging, » is the foundational skill of 4-track recording. It’s the process of mixing multiple recorded tracks down to one or two open tracks, freeing up the original tracks for more overdubs. However, viewing this as a purely technical step is a mistake. Bouncing is a production performance—a moment where you commit to a sub-mix permanently. Every bounce adds a layer of tape saturation and noise, so the goal is strategic reduction, not just track consolidation.
Case Study: Brian Wilson’s Pet Sounds 4-Track Bouncing Technique
Beach Boys co-founder Brian Wilson was a pioneer of this method during the 1960s recording of Pet Sounds. He would create complex instrumentals on a 4-track recorder, then bounce that material onto a single track of an 8-track machine to make room for the intricate vocal harmonies. This historic example shows how bouncing forces you to finalize instrumental balances and arrangements early, treating the sub-mix as a single, cohesive instrument.
To bounce effectively, you must plan your sessions like a military operation. Decide which instruments form a natural group (e.g., the rhythm section of drums and bass) and will be mixed together first. Pay close attention to gain staging; a signal that is too quiet will get lost in the noise floor after multiple bounces, while a signal that is too hot will distort aggressively. This is your first and last chance to get the balance right for that group of instruments. It’s not « fixing it in the mix »; it’s performing the mix as you go.
Action Plan: Strategic Bouncing Workflow
- Record your foundational tracks, such as drums and bass, planning which tracks will be bounced together.
- Create a « sub-mix » of the rhythm section, carefully balancing their levels and committing this mix to a single open track. This is a performance, not a temporary step.
- If your mixer has them, use external submix outputs to bounce elements together before they even hit the tape, preserving clarity.
- Fill the newly freed tracks with overdubs, always thinking one or two bounces ahead to maximize your available space.
- Embrace the sonic character of bouncing. The process adds a natural compression and « glue » that is a signature part of the lo-fi aesthetic.
This commitment is liberating. It forces you to move forward, building upon decisive choices rather than getting lost in endless possibilities.
Mono Drums: Where to Place One Mic to Capture Kick and Snare Equally?
Capturing a full drum kit with a single microphone is one of the biggest challenges—and creative opportunities—of 4-track recording. The goal isn’t just to hear everything, but to capture a balanced, punchy snapshot of the kit that works as a single, mono instrument. The secret lies in positioning the microphone not to capture individual drums, but to capture the drummer’s own mix in the air. This requires thinking about mic placement as a form of physical EQ and mixing.
The most effective starting point is the « over-the-shoulder » technique. By placing a single condenser microphone over the drummer’s right shoulder, pointing towards the snare, you capture a perspective similar to what the drummer hears. This position naturally balances the kick, snare, and cymbals. The distance from the kit controls the amount of room ambiance, while small angular adjustments can fine-tune the balance between the snare and hi-hats.

As the illustration shows, this placement is about capturing a complete picture. But the microphone is only half the equation. The other half is the drummer. According to a guide on single-mic techniques, the drummer must become the mixer, adjusting their own dynamics to create the perfect balance for the microphone. Louder kick hits, softer cymbal work—it’s a performance that is mixed before the sound even reaches the tape.
Action Plan: Single-Mic Drum Positioning
- Over-the-Shoulder: Start by placing the mic about 30cm above the drummer’s right shoulder, aimed at the snare. This is your baseline for a balanced sound.
- Coach the Drummer: Instruct the drummer to play as if they are self-mixing. Softer cymbals and intentional kick/snare hits are crucial for a clear mono recording.
- Use the Room as EQ: Place a wooden board under the kit to add attack and brightness. Use blankets or rugs around the kit to tame harsh cymbal frequencies.
- Advanced – The « Pre-Mix »: If you have two mics, use one on the kick and one overhead. Balance them on your mixer and record the summed mono signal to a single track on your recorder.
Ultimately, this approach forces you to commit to a drum sound from the very beginning, creating a cohesive and powerful foundation for your song.
Type I or Type II: Which Cassette Tape Formula Handles High Frequencies Best?
The cassette tape itself is not a transparent medium; it’s an instrument. The type of tape you choose dramatically impacts the final sonic character of your recording, particularly its high-frequency response and noise floor. This isn’t just a technical choice for fidelity—it’s an aesthetic decision that defines your demo’s texture. Understanding the difference between tape formulas is key to shaping your sound on the way in.
There are three main types you’ll encounter for multitrack recording: Type I (Ferric), Type II (Chrome/Cobalt), and Type IV (Metal). Each has a distinct personality. As noted in technical specifications, the general rule is that « Type 2 tapes tend to have less noise and flatter high frequency response than type 1, and type 4 tapes tend to have even flatter highs and even less noise. » But flatter and cleaner isn’t always better in the world of lo-fi.
Type 2 tapes tend to have less noise and flatter high frequency response than type 1, and type 4 tapes tend to have even flatter highs and even less noise.
– IEC Standards Documentation, Cassette Tape Type Technical Specifications
The choice depends entirely on the sound you’re chasing. Are you recording a gritty punk rock track that benefits from warmth and saturation? Type I is your ally. Are you recording a jangly indie pop song that needs crisp guitars and clear vocals? Type II will serve you better. The following table breaks down the characteristics of each formula, based on established cassette tape formulations.
| Tape Type | Formulation | High Frequency Response | Noise Level | Best For |
|---|---|---|---|---|
| Type I (Ferric) | Iron Oxide (Fe2O3) | 2-3kHz lower than Type II | Higher noise floor | Warm, saturated, gritty ‘punk rock’ tones with natural compression |
| Type II (Chrome/Cobalt) | Chromium Dioxide / Cobalt-doped Ferric | Flatter high frequency response | Lower noise floor | Crisp, jangly guitars, clearer vocals, ‘indie pop’ aesthetic |
| Type IV (Metal) | Metal Oxide | Exceptional headroom and detail | Lowest noise, highest clarity | Maximum fidelity but can sound ‘too Hi-Fi’ for lo-fi aesthetic |
Think of your tape stock as the final EQ in your chain. Its inherent character will be imprinted on everything you record, so choosing wisely is a foundational production decision.
The Over-Dubbing Mistake That Turns Your Mix into a Muddy Mess
With only four tracks, every instrument must have a purpose and a place. The most common mistake beginners make is layering parts on top of each other without considering how their frequencies will interact. This leads to a « muddy » mix, where the bass, low-end of guitars, and kick drum all compete for the same sonic space, resulting in an undefined and powerless sound. The solution isn’t to fix it with EQ later—it’s to prevent it from happening at all through strategic arrangement and frequency slotting.
Frequency slotting is the art of arranging your song so that each instrument « owns » a specific part of the frequency spectrum. Instead of having the bass guitar and the rhythm guitar both playing complex parts in the low-mids, you write parts that interlock like puzzle pieces. If the kick drum hits on the one and the three, perhaps the bassline is most active in the spaces in between. This « conversation » between instruments creates clarity and punch without needing to carve out space with EQ during a non-existent mixdown phase.
This approach transforms arrangement from a purely musical exercise into a technical one. You are essentially mixing the song before you’ve even recorded all the parts. By deciding that the guitar will be a mid-range texture and the bass will handle everything below 200Hz, you’ve made a powerful production decision that will guarantee clarity in the final bounce.
Your Action Plan: Auditing Your 4-Track Arrangement for Clarity
- Frequency Mapping: Before recording, listen to your parts together. Identify where instruments are fighting for space. Do the bass and guitar clash in the low-mids?
- Part Simplification: Actively rewrite or simplify one of the clashing parts. Can the guitar play a higher-octave line to get out of the bass’s way?
- Rhythmic Interlocking: Analyze the rhythm. If the kick and bass are hitting at the same time, can you shift the bassline to create a more compelling groove and clear up the low end?
- Role Definition: Assign a single, clear role to each overdub. Is this part providing harmony, rhythm, or texture? Remove anything that doesn’t serve its primary function.
- The Mute Test: As you build your tracks, periodically mute an instrument. Does the mix fall apart, or does it suddenly open up? If it opens up, that part was likely contributing to the mud.
By thinking about frequency from the beginning, you ensure that even with limited tracks, your final demo sounds full, powerful, and intentionally crafted.
When to Commit to EQ Decisions During Recording Instead of Mixing Later?
On a 4-track recorder, there is no « mixing later. » Every EQ decision made during recording or bouncing is permanent. This is what we call destructive commitment, and it is the most powerful tool for breaking free from the indecision of DAWs. The question isn’t *if* you should commit to EQ, but *when* and *how*. The answer is simple: always. You must shape the sound on its way to the tape.
Committing to EQ forces you to have a clear vision for each instrument’s role in the mix. Instead of recording a « full-range » guitar and hoping to fix it later, you decide upfront: « this guitar is a spiky, mid-range element. » You then use the mixer’s EQ to cut the unnecessary low-end rumble and perhaps some harsh high frequencies *before* hitting record. This carves out a perfect space for it in the mix from the start. As recording engineers on forums often note, this process is what gives analog recordings their unique character.
Bouncing is a real art… It provides a certain ‘glue’ you can’t get any other way, but more than the sound itself, it locks things in early on and gives you something to build on.
– Gearspace Forum Contributors, Professional Recording Engineers Discussion on 4-Track Techniques
This « glue » comes from multiple tracks sharing the same analog signal path and tape saturation, but it’s enabled by making smart, destructive EQ choices. The philosophy should be subtractive: cut problematic frequencies rather than boosting desired ones. Cutting a frequency is cleaner and creates more headroom, which is precious in the limited analog world of tape.
Action Plan: Destructive EQ Commitment Workflow
- Adopt a Subtraction Philosophy: Always try to cut bad frequencies first. Remove low-end rumble from vocals and guitars (below 100Hz) and cut « boxy » mid-range frequencies (around 400Hz) to create clarity.
- Apply the Single Purpose Rule: Before touching an EQ knob, define the instrument’s one job in the mix (e.g., foundation, texture, lead). Then, EQ aggressively to help it do only that job.
- Embrace Creative Liberation: See commitment as an escape from « option paralysis. » Making a strong EQ choice and moving on maintains creative momentum and helps you finish the song.
- Optimize the Signal Path: If you have external preamps, consider using them and routing directly into your recorder’s line inputs to bypass the machine’s own EQs and faders, which can degrade the signal.
This approach isn’t about limitation; it’s about control. You are the one shaping the sound, not a plugin you’ll apply three days from now.
How to Get a Crushing Punk Tone With Only One Amp and No Pedals?
A massive, aggressive punk guitar tone doesn’t require a board full of distortion pedals. In fact, some of the most iconic punk sounds were created with nothing more than a guitar, a cable, and a small tube amp pushed to its absolute limit. The secret lies in understanding that the amp itself is the primary distortion effect, and the microphone’s position is the ultimate tone-shaping tool. It’s an exercise in controlled chaos.
First, abandon the idea of « clean headroom. » Turn the amplifier’s volume or gain knob up until it starts to break up and compress naturally. This is the source of your core distortion. Your guitar’s volume knob now becomes your gain control; rolling it back slightly will clean up the sound, while turning it to 10 will give you maximum saturation. This dynamic control is far more expressive than stomping on a pedal.
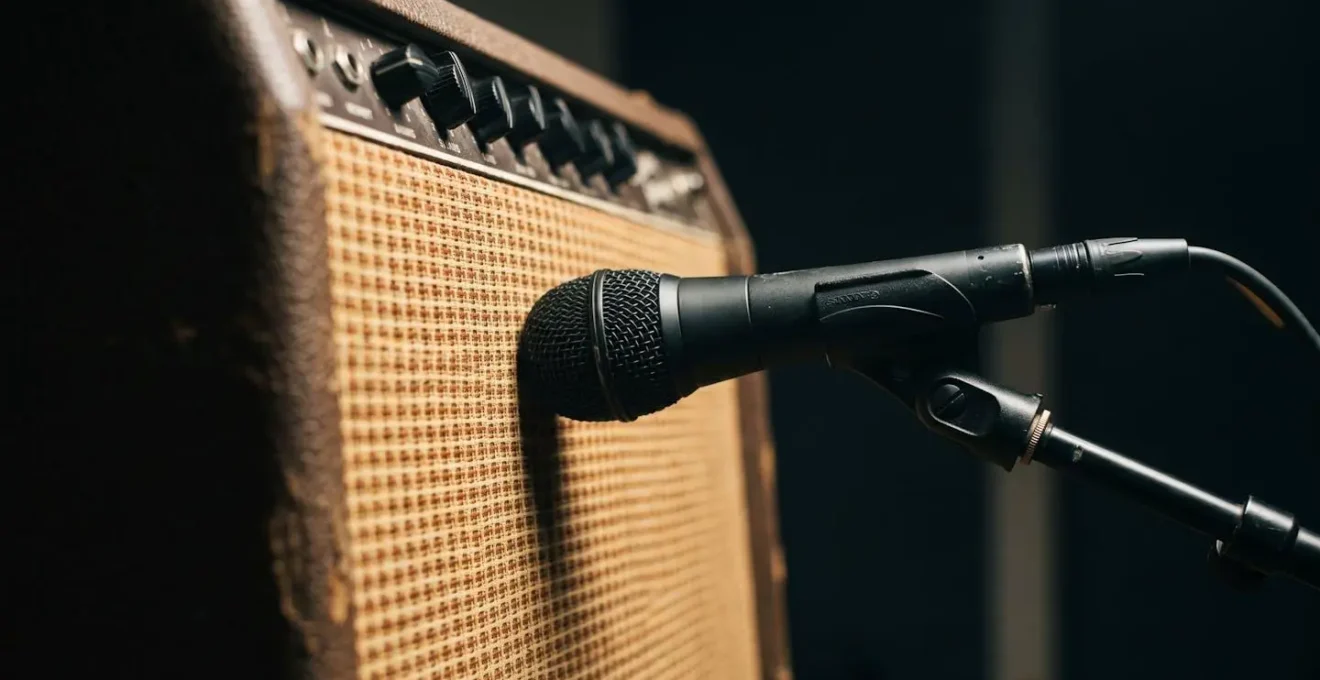
Next, microphone placement becomes your EQ. As shown in the image, placing a dynamic microphone (like an SM57) right up against the grille cloth is standard, but its exact position on the speaker cone is critical.
- Center of the cone: This position captures the most high-frequency content, resulting in a bright, aggressive, and « fizzy » tone.
- Edge of the cone: Moving the microphone towards the outer edge of the speaker softens the high-end and introduces more low-mids, resulting in a warmer, thicker sound.
- Angling the mic: Angling the microphone 45 degrees off-axis from the speaker can further tame harsh frequencies, giving you a smoother distortion without losing aggression.
Experimenting with these positions for just a few minutes will yield a wider range of tones than many distortion pedals can offer.
By manipulating these simple variables—amp gain, guitar volume, and mic position—you can craft a crushing, dynamic punk tone that is entirely your own, proving that a heavy sound comes from technique, not just technology.
How Does Limited Track Count Force More Creative Arrangement Decisions?
The four-track limit is not a barrier; it’s a filter. It forces you to distill your song down to its essential components. In a DAW, it’s easy to layer 16 tracks of guitars, thinking you’re creating a « big » sound, when you’re often just creating mud. A 4-track recorder makes this impossible and, in doing so, pushes you toward smarter, more impactful arrangement choices. The constraint forces you to create the illusion of complexity through simplicity, a concept perfectly demonstrated by some of lo-fi’s most prolific artists.
Case Study: The Guided By Voices 4-Track Aesthetic
The band Guided By Voices, a legend in the lo-fi scene, built a massive discography almost entirely on a 4-track Portastudio. Their songs often sound huge and complex, but are built from simple, interlocking parts. They are masters of what can be called the « Phantom Instrument » principle: writing arrangements where different instruments play in the gaps left by others. A short guitar riff answers a vocal line, a bass run fills the space after a drum fill. This creates a sense of richness and density without actually layering sounds on top of each other.
This approach fundamentally changes how you write. You start thinking in terms of conversation and negative space. Instead of adding another rhythm guitar, you ask, « What is the single most important melodic or rhythmic idea that needs to happen in this section? » This minimalist mindset leads to stronger, more memorable parts. It’s a key reason why there’s been such a resurgence of interest in this aesthetic, as artists seek authenticity in a digital world. In fact, a recent market analysis shows a 345% increase in Google searches for lo-fi music over the past five years, indicating a powerful cultural shift towards this very sound.
The limited track count is a creative crucible. It burns away the unnecessary parts of your arrangement, leaving only a strong, essential core. You learn that a single, perfectly placed note can have more impact than a wall of guitars.
This isn’t about making your music smaller; it’s about making every element on the tape matter more.
Key Takeaways
- Perform the Production: Treat every recording and bouncing decision as a final, committed performance, not a temporary step.
- Destructive Commitment is Liberation: Embrace permanent EQ and effects choices on the way to tape to kill « option paralysis » and maintain creative momentum.
- Arrange for Clarity: Use frequency slotting and interlocking parts to prevent a muddy mix before it ever happens, making every instrument count.
How to Use Limitations to Fuel Creativity Like The Beatles Did at Abbey Road?
The Beatles, working with 4-track machines at Abbey Road, didn’t see their limited track count as a handicap; they saw it as a puzzle to be solved. They invented techniques like bouncing and tape loops not just to overcome technical hurdles, but to create sounds no one had ever heard before. This is the final lesson of the 4-track: limitations are the very engine of innovation. In an age of infinite digital choice, re-introducing constraints can be the most powerful way to unlock true creativity.
The modern « bedroom musician » has access to technology that was once the exclusive domain of professional studios. Yet, many find themselves artistically stuck. As the history of lo-fi music shows, this has led many artists to look backward, toward vintage equipment, as a way to find an authentic voice. The renewed popularity of the lo-fi aesthetic, with Spotify playlists like Lofi Beats garnering over 51,000 monthly listeners in early 2024, is a testament to the appeal of this sound.
The rise of modern digital audio workstations dissolved a theoretical technological division between professional and non-professional artists. Many prominent lo-fi acts adapted their sound to more professional standards and ‘bedroom’ musicians began looking toward vintage equipment as a way to achieve an authentic lo-fi aesthetic.
– Wikipedia Contributors, Lo-fi Music Cultural History
So how do you actively use these limitations? You can gamify the process. By setting up « challenge cards »—inspired by Brian Eno’s Oblique Strategies—you can turn a creative block into a moment of discovery. Instead of trying to get a « perfect » sound, you intentionally pursue an « imperfect » one, and often find something far more interesting in the process. The 4-track isn’t just a recorder; it’s a creative partner that pushes back.
Action Plan: Oblique Strategies for 4-Track Creative Blocks
- Challenge Card 1: Record all of your vocals for a song through a guitar amplifier to embrace the texture and character of lo-fi « imperfections. »
- Challenge Card 2: Create a complete rhythm track for your song without using a traditional drum kit. Use found sounds, hand claps, or unconventional percussion.
- Challenge Card 3: After bouncing a track, try reversing it. Listen for unexpected textures or melodic ideas that you can build upon.
- The Psychology of « Done »: Use the physical end of the tape and the finite track count as a hard deadline. This psychological tool helps combat perfectionism and forces you to actually finish your songs.
The most important feature of a 4-track cassette recorder is that it forces you to finish. Stop researching, stop planning for the perfect setup. Plug in an instrument, press record, and start performing your next production.